Biphase Mark Code
History
The History behind why Biphase Mark Code was made is pretty simple, Biphase mark coding (BMC) was developed to address a difficulty in traditional digital signals. Like a traditional digital signal, one bit is transmitted for each clock cycle. Unlike a traditional digital signal, between each bit a transition in polarity (from high to low or low to high) occurs. In order to transmit a “1” value, a transition also occurs after half a clock cycle (a clock cycle can also be referred to as a cell). This fixed the issue of clock rates being out of sync between the transmitter and receiver.
What is BMC used for
Biphase Mark Code is used in Network Systems as it allows them to use 1 cable for transmitting and 1 for receiving instead of 2 for both because BMC has Clock Recovery abilities and doesn’t require the need for a seperate wire for the clock itself. Add more to this Biphase Mark Code was also used in the Pianocorder Data Format which is the sole reason this page exists. The use of BMC for the pianocorder turned out to be very handy as all the pianocorder has to do is detect the edges, sync bit and also waveshape the signal to then be able to make suitable outputs.
How to Encode BMC
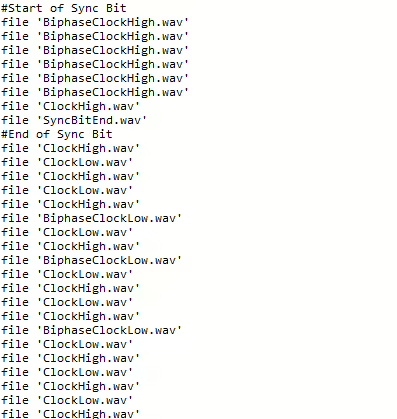
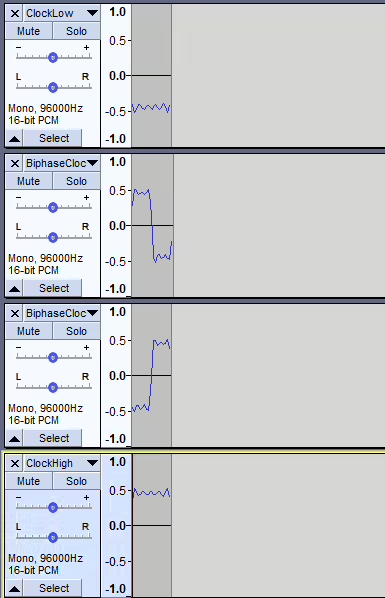
To Encode BMC (Biphase Mark Code) via Digital Encoding you would want to make roughly around 4 - 6 Audio Files. Firstly, You want to make a few tones. These tones will be your clock signals. You want to make square waves usually but you can also use sine waves. If you want a 4.5KHZ clock signal for your when you get a 1 in your data, you want to make sure you create a tone for 4.5KHZ. When you make your tone export 2 selections from it. 1 with it starting up and then goes down. Then another when it begins down but goes up. These are vital as Biphase 1’s aren’t just 1 single signal. Secondly, You want to make a tone that your regular 0 clock will be on. This clock is for when your data shows a 0. Using the example above since our Biphase audio’s tone is at 4.5KHZ make sure you use half of the frequency, so I would use 2.25KHZ. When you make the tone you want to select only the high part and export that and you want to get also only the low part. This is key as sometimes you will come across a 1 after a high part. I will provide some images to show what I mean Now this part is optional but you can also make your own way to find the end of a data frame and also to synchronize the frames so data doesn’t fall out of sync and the data doesn’t start doing other things it shouldn’t be doing. To do this you would want to add at the end of a frame a audio file or even just a combination of 0’s and 1’s. 8 bits should work as the Pianocorder Data Format does use only 8 bits to sync but if you want to make sure you don’t accidentally set off your sync bit due to the data you encode you can make it more lengthy. For example instead of the Pianocorder’s 11111101 for its sync bit you could use 1000111001100011 which decodes to 8E63 in hex. After you have made your Audio Files you can begin the next part which would be to create a program to generate the sequence of biphase. Now you could use any sort of programming language to generate the audio required such as using a program that adds all the audio together based off data, or you can just make a program that generates a txt that can be used with ffmpeg to add all the files. To Generate the files with FFMPEG you are going to need to make sure the audio files are in the same folder so its easier for you to code. You want to begin with the regular clock tone. Make sure that it alternates as thats how edge detection works which is what most BMC Decoders use. When you come across a 1 check to see if the clock was high or low. If the clock was high make sure you put the 1 that goes from low to high and not high to low as you need to have the edge there or it will mess up. If the clock was low before make sure you do the 1 that goes high to low to have the edge in the correct spot. If you have multiple 1’s in a row use the same 1 audio file till you get a 0. After make sure to do the opposite of the 0 previously because as previously mentioned it keeps the edge in the correct spot. If you choose to have a sync bit its usually easier to have the data already have the bits for it as it allows your code to easily determine what it needs for it. After generating the txt make sure to save it in the same folder with the biphase audio files. You then want to navigate to it in either Command Prompt or Terminal and run the following command to then create the biphase sequence and export it to wav. ffmpeg -f concat -i (insert txt name here).txt output.wav
Decoding BMC
Decoding BMC (Biphase Mark Code) is a hard task for many to comprehend even writing code to do so. It makes sense as to write code for decoding this type of Biphase you would more than likely have to write it for the system you are trying to decode the biphase of. This part of this page is more of a general theory as I still need to figure out the code behind it to help everyone. So my theory is as follows. If you want to decode Biphase from an audio stream I would check the following so it makes it easier to make. Firstly I would check the sample rate of the audio file, I would properly make the code detect if the audio file is around 48Khz as its a generally good sample rate and keeps most data working properly. I would then make the code scan the samples and determine a middle ground for the data so you can detect edges. Secondly, I would include a portion that puts all the information into 1’s and 0’s based on whats happened. I would store that info into an array then use that array to determine if there was a transistion after 7ish samples. and if so that is a 0. If a transition happened before the 7ish sample or happened on the 7ish sample I would properly make that a 1. After the decoding process I would save the results to a txt file. If you had a sync bit I would find out the hex of it and then try and make the system detect if that hex was found and if so add a line ending to the txt file so every frame is on a new line.
Search for: "Biphase Mark Code" on the forums!


