Showtape Preservation & Archival
This page details some rough guidelines to follow when preserving data of various types. Note that these guidelines include some very detailed information and may reference the use of specialized equipment, all in the interest of getting the best quality preservation possible. Do note, however, that even a poor quality preservation is better than none at all, so even if you don’t have the best equipment available to you, please do what you can to save these materials from being lost to time. Please feel free to contact the admins for assistance with preserving any type of media. We’re happy to help!
General
Documentation
Preserving media is not only about preserving the actual contents of the media itself – it also encompasses documenting the media, your preservation methodology, and any supporting materials. This can be as simple as a text file along with the main files. Please include the following with all rips, scans, etc when possible:
- Format - both the format of the original media (CD, 8.5x11’ flyer, etc) and the format you are using for preservation (FLAC audio, PNG image, etc). If the media is part of a set of multiple discs, pages, etc, please list the parts you preserved and any that are missing.
- Equipment used - the brand name and model of any equipment used in the process.
- Equipment settings - any configuration settings (scanner DPI, turntable speed, etc) or special tweaks used during preservation.
- Meta images - for example, include scans of the front/back cover, inserts, and disc itself if you are ripping a CD. When dumping an EPROM, include a photo of its location in the device. etc
- Known issues - note anything that might make the rip appear imperfect, such as a tear in page 7 of a pamphlet, a scratch around the 3:00 mark on a vinyl record.
- Credit - include your name and optionally some contact information. This not only gives you credit for your time and effort, but helps someone reach you if they have questions.
Audio
All audio should be ripped in a lossless format such as WAV or FLAC.
CD
CDs are by far the easiest format to rip. They should be ripped using a high quality program, preferably Exact Audio Copy. The target audio format should be a single audio file with a cue sheet. This ensures the information on gaps between tracks is preserved. The audio file and cue sheet can later be split into individual files for normal playback in media players. Do not apply any normalization or other processing (ReplayGain tagging is OK).
Cassette tape
Most cassette media is in standard 2-channel per side format and can be ripped using consumer equipment. It’s important to use a high quality cassette deck - all new modern decks sold are of poor quality and will result in poor quality rips. A good name brand component deck from the 80s or 90s is preferred, especially if it has been serviced recently and is verified to run at the correct speed. Speed test tapes are available via eBay and other outlets. Unless you’ve verified that one side is completely blank, rip both sides of the tape and note which file is which side. 3- and 4-channel tapes require the use of special decks. Contact D3 for assistance with these.
Open reel tape
TODO, but largely the same rules as cassette applies.
MiniDisc
MiniDisc can be a frustrating format to deal with due to Sony’s insistence on heavy-handed copy protection. MDs which have been recorded directly on the device and not transferred via NetMD can have the data copied directly to the PC using a supported player (MZ-RH1, MZ-M200). Other players are not capable of this, and the best option for ripping is an optical output if available, and analog output if not.
Vinyl records
In order to digitize the audio, make sure the record player used has a USB port on it or have a seperate audio output to USB cable. These can be found on Amazon for rather cheap. The quality of the sound depends mostly on the needle used and the quality of the respective player. For the best rip possible, a mid tier record player (ex: Audio Technica) is recommended. Note if the player has a preamp built in or not, if not then an external one is needed. A Fluance PA10 High Fidelity Phono Preamp is recommended in that case. Replacing the needle with a new one is recommended for the cleanest audio cut possible. When ripping an vinyl record, digitize it to a good music editing software like Audacity to get the raw recording. This can be done by plugging in the USB port into a computer, opening up Audacity and press the recording button once the record begins spinning. Make sure the player is recognized by Audacity, or else it might record nothing. Turning off or unplugging any microphone is recommended to prevent any outside recording from interfering with the recording. Once the recording is done, press the square stop button to stop the recording. Crop the moments of silence out using Audacity. Do not cut anything during a recording or interfere with the file after this, a raw recording is the best way to preserve content. Then, press file and scroll down to export. Select export and export it as an MP3 file. Alongside archiving the MP3, scanning the record label is also apart of archiving the record, even if the label is blank. This can be done by putting the vinyl in a protective paper sleeve of its respective size (7’ or 12’). Scan the record as this. If you cannot scan the record, take high quality pictures of the record. Recommended Record Players: Audio-Technica AT-LP60XUSB-BK (budget, 149.99) Fluance RT82 (299.99)
Audio Input Notes
Do a dry run and make a test recording of the media before you do your final rip. Make sure that the audio levels are strong, but never clip. A good target is to have the absolute loudest peaks of the audio registering around -6dBFS in the recording software. This ensures a good signal to noise ratio without the risk of clipping. If the audio level is too low, it can be amplified later in software, but amplifying very quiet audio will result in additional noise. When ripping from analog media, it’s important to use a good quality audio interface. The line input on a desktop PC is usually good enough for 2-channel content, but make a test recording of a few seconds without the source device playing, to ensure there isn’t any excessive background noise, as this is a common issue on built-in inputs. Also be aware that many PCs have removed the line input and may only offer a microphone input – this is not the same as a proper line input, as it works at different signal levels, supplies bias power for the microphone, may be mono, etc. Line input jacks are typically blue. On formats that use more than 2 channels, please do not be tempted to make separate rips 2 channels at a time – purchase a proper interface that supports enough simultaneous channels and always rip all channels simultaneously. Ripping the same tape multiple times and combining the files later will cause timing issues. Recommended USB audio interfaces, with good performance for the cost:
- 2-channel (budget): Behringer UCA202/UCA222
- 2-channel: Behringer UMC202HD, Focusrite Scarlett 2i2
- 4-channel: Behringer UMC404HD, MOTU M4
Audio Post-Processing Notes
The goal is to preserve the signal in the most raw form possible, which provides the best basis for any further restoration or cleanup efforts. It’s okay to make processed versions of audio, for example to add EQ or reduce noise, but please save and provide the original unmodified files as well.
Noise Reduction, Wave Shapers, & Other Modifiers
Many tape-based formats use various noise reduction systems, such as Dolby or DBX. If noise reduction is used, it is preferable to make separate rips both with and without noise reduction enabled on the deck. Note this does not apply to Dolby HX/HX Pro as this system is applied at record time only, and is not decoded upon playback. Please note any noise reduction systems used in your rip’s documentation. Tape-based animatronics control systems often use a ‘wave shaper’ in line with the data channels to provide the controller with a clean signal from the tape. It is preferred to rip these tapes without the wave shaper in the signal path. A second rip can be done with it connected normally, but this must be done with CAUTION, as wave shapers substantially raise the voltage of the signal, meaning the signal is not audio anymore once it leaves the wave shaper. This can cause DAMAGE to some capture equipment, particularly lower-end capture equipment.
Tape Notes
Please clean all parts in the tape path before each recording. This includes the playback head, pinch roller, and capstan. 90% or higher isopropyl alcohol and a Q-tip is suitable for heads and the capstan.
Video
DVD
Correctly preserving DVDs can be done in multiple ways, and the available options depend on the type of disc. DVDs without copy protection (such as Chuck E. Cheese showtapes) can simply be ripped to an ISO and this is the preferred method. DVDs with copy protection need special handling - TODO.
VHS, Beta, SVHS
TODO. Add note about capturing all 4 audio channels simultaneously on VHS era CEC showtapes. Also note that despite CEC tapes are SVHS, they are encoded in VHS and don’t need special SVHS VCRs to play. And to note that any found with non-SVHS marked shells are common bootlegs.
LaserDisc
Domesday Duplicator is the way to go here. TODO.
Film, Super-8, & MPO Videotronic
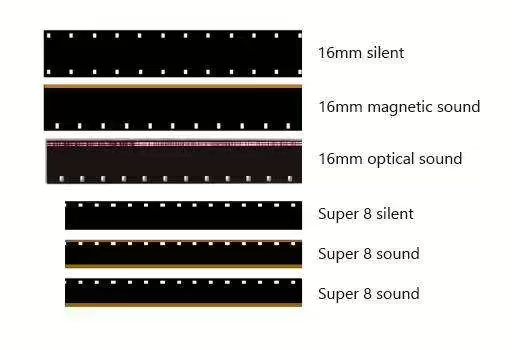
Most film can be run through a standard 8mm or 16mm scanner for capture. If the film is in a cartridge, such as the PTT 1981 Training Tapes, which use the MPO Videotronic Super-8 cases, they can be removed from the cartridge safely and spun on a reel for capture. Films with audio strips, such as those seen in the right diagram, require special attention to ensure the capture device or service providing capture has the capabilities to record sound. Many services for ripping film strips state in their fine print that they don’t offer audio, and the rip will be returned silent.
Data
CD-ROM & DVD-ROM
Assuming the disc has no copy-protection, the ImgBurn software is the way to go. After downloading the software, click ‘Create Image File From Disc’, and allow the ISO to be created. Copying folders using Windows Explorer is not good enough for preservation, as it does not show all files, nor any disc metadata or deleted files on the disc. A full ISO is needed to be properly archived and re-burnable.
Floppy Disks
TODO. Use a good drive, save multiple separate copies if there are read errors, try cleaning heads. Most of our knowledge applies to 3.5’ HD disks, 5.25’ stuff is not really seen. Use WinImage to create a .ima file of the disc, as copying the files off the disc is not enough for accurate and complete preservation, especially when it pertains to metadata and deleted files.
USB, SD card, & Hard Drives
TODO. Images always preferred rather than simple copies of files. Best to do under Clonezilla or something that won’t mount it and spray random files all over the disk (Windows likes to add ‘System Volume Information’ directories, Mac OS adds DS_Store, etc). Compress to ZIP/RAR/etc to shrink any blank space, also this includes a checksum, etc
ROM, EPROM, EEPROM, & Flash.
TODO. TL866ii is a good general purpose programmer to dump ROMs. NEVER remove stickers over the top UV erasure windows! Make multiple dumps and make sure they match. Include a photo of the device itself and its location and refdes in the device, any labels, etc.
Websites
TODO. Submit to the Internet Archive (Wayback Machine), maybe some info on HTTrack / wget’s archiving options. ‘Save Page As’ is not good enough (although better than nothing)
Loose files
TODO. Info about preserving any random files. Note about using a ZIP or RAR archive, even for a single file, as archives will preserve the file timestamps.
Printed material
Photos
TODO.
Newspaper Articles, Magazine Clippings, & Other Text Media
TODO.
Posters
TODO. Maybe some notes on how to handle large items that can’t fit in normal scanners.
General Notes
TODO. Worth mentioning that scans should note the DPI it was scanned at so the exact physical size can be determined from the size in pixels (or use PDF or a format that preserves this info). Also don’t use any auto rotation correction as it might be using lower quality rotation algorithms.
Other
TODO. Maybe some notes about 3D scanning photogrammetry stuff, how to take good photos of bot mechanisms (include some object for scale, multiple angles, etc).
Search for: "Showtape Preservation & Archival" on the forums!
